How to make partition in windows 7/8/10?
Содержание:
- Программы для разбивки диска на разделы
- The DiskPart alternative — AOMEI Partition Assistant
- Windows 10 Diskpart Extend Volume
- Форматируем винчестер через БИОС
- Primary Partition and Logical Partition
- List of Diskpart Commands in Windows 11/10
- Как создать загрузочную флешку с помощью командной строки
- Why and How to Convert Primary Partition to Logical
- Solution 1 — Extend Volume in Windows 10 Disk Management — Extend Volume is Enabled [Video guide included]
- diskpart in Windows 10
- Fsutil Utility
Программы для разбивки диска на разделы
Разделение диска домашнего компьютера на разделы можно отнести к редкой процедуре и поэтому нет смысла покупать для этих целей платное программное обеспечение с мощным функционалом.
Ниже представлены бесплатные версии программ коммерческих проектов, но для домашнего использования они бесплатны. При желании их можно расширить до профессиональных версий.
AOMEI Partition Assistant
AOMEI Partition Assistant — простой и функциональный менеджер дисков, который может не только разделить диск или объединить разделы, но и выполнить множество прочих востребованных операций: копирование диска, клонирование раздела, конвертер NTFS в FAT, преобразования диска из MBR в GPT, перенос ОС с одного диска на другой.
Официальная страница программы: https://www.aomeitech.com/aomei-partition-assistant.html.
Недостатки программы: быстрое и удобное разделение диска доступно только в платной версии AOMEI Partition Assistant, а в бесплатной придется сначала уменьшить один раздел, а затем на освободившемся пространстве диска создать новый раздел.
1. Запустите программу и кликните правой клавишей мыши по разделу или логическому диску, который хотите разделить. Выберите пункт меню «Разделение раздела».
2. Перетащите ползунок для изменения размера нового раздела или уменьшите размер раздела явно в Гигабайтах, в соответствующем окошке и нажмите кнопку .
3. Среди разделов диска появится свободное пространство. Кликните по нему правой клавишей мыши и выберите пункт «Создание раздела»
4. Укажите размер диска, букву и файловую систему и нажмите кнопку .
5. Для применения выполненных манипуляций нажмите кнопку в основном меню программы.
В случае разделения системного диска C:, на котором установлена операционная система, потребуется перезагрузка компьютера.
Компьютер будет перезагружен программой в среду Windows PE, в которой будут выполнены все необходимые операции по работе с разделами диска и по завершении загрузится операционная система Windows с измененными разделами дисков.
Minitool Partition Wizard Free
Minitool Partition Wizard Free — бесплатная версия весьма функционального и удобного менеджера разделов диска. Помимо основного функционала, работающего с разделами и файловыми системами диска, программа радует дополнительными бесплатными инструментами такими как «Анализатор пространства диска» и «Тест скорости диска»
Официальная страница программы: https://www.partitionwizard.com/free-partition-manager.html.
Недостатки программы: отсутствие русского языка.
Разбить диск на разделы с помощью Minitool Partition Wizard можно с помощью пары кликов.
1. Укажите раздел на диске, который хотите поделить и кликните в боковом меню «Split Partition».
2. Перетащите ползунок или введите число, чтобы задать размер нового раздела и нажмите кнопку .
3. Для применения заданных изменений нажмите кнопку , которая находится в левом нижнем углу.
4. Для работы программы настоятельно рекомендуется закрыть все прочие приложения и программы. После выполнения рекомендации нажмите кнопку .
Если вы планируете разделить системный диск, то для выполнения операции программа потребует перезагрузить компьютер. Нажмите кнопку .
После перезагрузки запустится консольная версия программы и выполнит все необходимые операции. Для разделения системного диска, содержащего операционную систему, потребуется подождать несколько минут. Дождитесь выполнения операций с разделами диска и проверьте результаты.
Как видите, способов разделить диск на несколько разделов вполне достаточно и каждый может выбрать для себя наиболее подходящий. Главное помните: при работе с разделами диска всегда есть риск потерять хранящуюся на нем информацию, если в этот момент произойдет какой-то сбой в работе компьютера.
The DiskPart alternative — AOMEI Partition Assistant
DiskPart is a great disk management tool, but it does have many limitations.
-
To perform it on the computer, you must be a member of Administrators group, or
you must have been delegated the appropriate authority. -
You can create primary/extended/logical partitions only on basic disks.
-
You cannot create partitions on removable media.
To overcome those limitations, find a software to replace it is an effective way.
Fortunately, the AOMEI Partition
Assistant is a complete, reliable and easy hard disk partition manager which
provides both GUI and command-line to partition disks in Windows 10/8.1/8/7/Vista/XP
and Windows Server 2000/2003/2008 (R2)/2011/2012 (R2)/2016.
Method 1: create partition with AOMEI Partition Assistant GUI
AOMEI Partition Assistant provides you a graphical user interface (GUI) to partition
hard drives. You can use it t create partition on an existing partition, or an
unallocated space. With the intuitive interface, creating partition for computer
should be very easy that even a noob can operate alone.
Step1. Download, Install
and launch AOMEI Partition Assistant. You will see its concise main interface with
the basic environment of your hard drive(s).
Step2. As we mentioned above, you can use it to create new partition directly on an existing partition or an unallocated space. Just right click on a partition wihch has enough free space, select «Create Partition» at the drop-down menu.
Step3. After clicking «Create Partition», it will pop out
a window where you can resize partition for your new partition by drag the arrow to left or right, or you can type the
number in the box. Click OK.
Step4. Now, you can preview the change of your hard drive in the
main interface. Don’t forget to click Apply on the tool bar to
submit all operations.
This way can create partition with a simple few clicks. It is much easier to operate
than DiskPart create partition. Besides, you can use it to move, resize, extend,
shrink, merge, split, copy, delete, format, wipe partitions, etc. It has many other
utilities for you to partition a hard drive.
Method 2: create partition with AOMEI Partition Assistant Command-line
To create partition with CMD, AOMEI Partition Assistant can do it in simpler
commands. You can follow the steps in the next content.
1. Open the command prompt by clicking Start and typing
«cmd» or pressing «WIN+R» and
typing «cmd». Then, type: cd C:\Program Files\AOMEI
Partition Assistant Pro Edition 6.3 (The path is your AOMEI Partition
Assistant installation directory), and press Enter.
2. Type «partassist.exe /list» to list all the disks.
3. Then, it will list all disk in a new window. Type: partassist.exe /hd:n /cre
/pri /size:50GB /fs:ntfs /align /label: Data /letter:H. Press Enter.
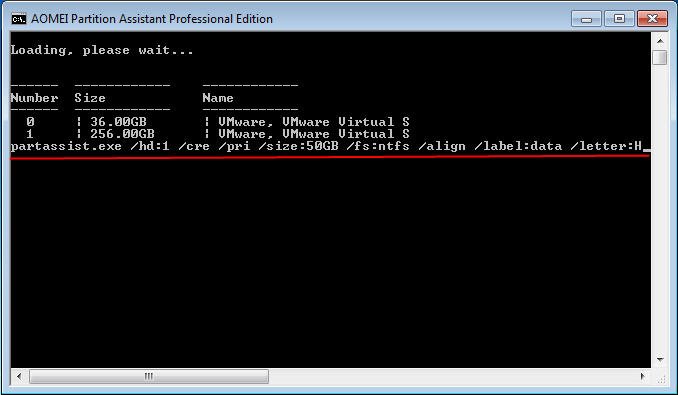
4. Wait a second. This will create a primary partition as the screenshoot below.
If you want to create an auto size partition using the first block of unallocated
space on a disk, type the following command at the command prompt:
partassist.exe /hd:n /cre /pri /size:auto /end/ fs:ntfs /align /label:DATA
/letter:E
If you want to create partition using offset, type:
partassist.exe /hd:n /cre /pri /size:n /offset:n /fs:fat32 /act /align
/label:DATA /letter:F
Notes:
-
«/hd» followed by disk number, which starts with 0.
-
The value of «/size» can be auto or specified size in MB by default,
and GB is also available. -
«/fs» means file system, whose value can be fat16, fat32 or ntfs.
-
«/pri» means creating a primary partition.
-
«/end» means creating a specified size back end partition using the
unallocated space at the end of a disk. -
«/act» means creating an active partition.
-
«/hide» means creating a hidden partition.
-
«/letter» means assigning a drive letter to the partition.
-
«/offset» means creating a partition from the location of specified
offset, starting with the beginning of the disk. -
«/label» means setting a label for the partition.
AOMEI partassist.exe uses the very simple command so that it can be used more easy
than DiskPart, you do not need to list every disk every time, just do it with the
whole commands. Besides, you can learn more how to use AOMEI Partition Assistant
Command Line, please click here.
Windows 10 Diskpart Extend Volume
When disk partition runs out of space on Windows 10, somebody would like to run Diskpart command to perform partition resizing so as to increase the size of the volume which has not enough free space.
How to extend volume by running Diskpart command in Windows 10?
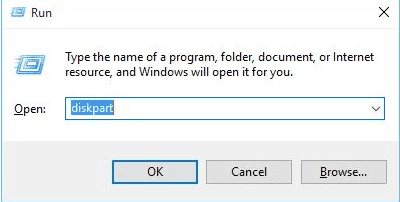
1. Click «Start» > «Run» > type «diskpart» and click «OK» so as to open the Diskpart command window
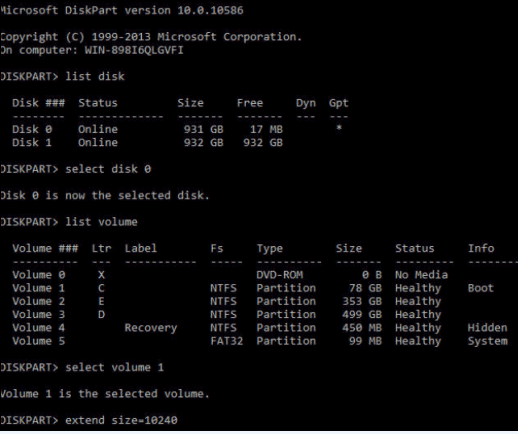
2. Type the «list volume» and it will show which volume you can choose to extend the partition that has low disk space. For example, if the list volume shows to select volume 1, you should type «select volume 1». Then, it will show a message saying «volume 1 is the selected volume». Finally, you should type «extend», after which diskpart will extend the selected partition.
In most case, most people do not like to run Diskpart command to extend volume because it is difficult to handle. You have to type each command on the Diskpart command window, which is a complex task for many computer users.
Форматируем винчестер через БИОС
Для выполнения поставленной задачи нам понадобится DVD или USB-накопитель с дистрибутивом Виндовс, который имеется в запаснике у любого мудрого пользователя ПК. Попробуем также сами создать аварийный загрузочный носитель.
Способ 1: Использование стороннего софта
Для форматирования жесткого диска через BIOS можно применить один из множества дисковых менеджеров от различных разработчиков. Например, свободно распространяемый AOMEI Partition Assistant Standard Edition.
- Скачиваем, устанавливаем и запускаем программу. Сначала нам надо создать загрузочный носитель на платформе Windows PE, облегченной версии оперативной системы. Для этого переходим в раздел «Сделать загрузочный CD».
Выбираем вид загрузочного носителя. Затем нажимаем «Перейти».
Дожидаемся окончания процесса. Завершаем кнопкой «Конец».
Перезагружаем ПК и входим в BIOS посредством нажатия клавиши Delete или Esc после прохождения первоначального теста. В зависимости от версии и марки материнской платы возможны и иные варианты: F2, Ctrl + F2, F8 и другие. Здесь меняем приоритет загрузки на нужный нам. Подтверждаем изменения в настройках и выходим из прошивки.
Загружается Windows Preinstallation Environment. Опять открываем AOMEI Partition Assistant и находим пункт «Форматирование раздела», определяемся с файловой системой и нажимаем «OK».
Способ 2: Использование командной строки
Вспомним старый добрый MS-DOS и давно известные команды, которые многие пользователи незаслуженно игнорируют. А зря, ведь это очень просто и удобно. Командная строка предоставляет широкие функциональные возможности для управления ПК. Разберемся, как применить её в данном случае.
- Вставляем установочный диск в дисковод или флешку в порт USB.
- По аналогии со способом, приведенным выше, заходим в BIOS и ставим первым источником загрузки DVD-привод или флешку в зависимости от места нахождения загрузочных файлов Виндовс.
Сохраняем внесенные изменения и выходим из BIOS.
Компьютер начинает загружать установочные файлы Windows и на странице выбора языка инсталляции системы нажимаем сочетание клавиш Shift + F10 и попадаем в командную строку.
В Виндовс 8 и 10 можно перейти последовательно: «Восстановление» — «Диагностика» — «Дополнительно» — «Командная строка».
В открывшейся командной строке в зависимости от поставленной цели вводим:
- — быстрое форматирование в FAT32;
- — быстрое форматирование в NTFS;
- — полное форматирование в FAT32;
- — полное форматирование в NTFS, где C: — имя раздела жесткого диска.
Нажимаем Enter.
Дожидаемся завершения процесса и получаем отформатированный с заданными характеристиками том жесткого диска.
Способ 3: Применение установщика Windows
В любом установщике Виндовс присутствует встроенная возможность отформатировать нужный раздел винчестера перед инсталляцией оперативной системы. Интерфейс здесь элементарно понятен для пользователя. Трудностей быть не должно.
- Повторяем четыре начальных шага из способа № 2.
- После начала инсталляции ОС выбираем параметр «Полная установка» или «Выборочная установка» в зависимости от версии Windows.
На следующей странице выбираем раздел винчестера и нажимаем «Форматировать».
Поставленная цель достигнута. Но этот способ не совсем удобен, если вы не планируете ставить новую операционную систему на ПК.
Мы рассмотрели несколько способов того, как можно отформатировать жесткий диск через BIOS. И будем с нетерпением ждать, когда разработчики «вшитых» микропрограмм для материнских плат создадут встроенный инструмент для этого процесса.
Опишите, что у вас не получилось.
Наши специалисты постараются ответить максимально быстро.
Primary Partition and Logical Partition
Primary partition is the hard disk partition that contains files and data essential for Windows operating system to start up, and it is the only partition that can be set active. Besides, other data can be stored on a primary partition as well.
For an MBR disk, only 4 primary partitions or 3 primary partitions plus 1 extended partition (can be further divided into multiple logical partitions) at most are allowed to be created. But for an GPT disk, up to 128 primary partitions can be created.
Logical partition is the hard disk partition created in extended partition on an MBR disk. As extended partition itself cannot be used to store data directly, the logical partition is a further partitioned block of the extended partition.
Like primary partition, a logical partition can be used to install Windows and any other types of files, but you are unable to set it active. That is to say, primary partitions are bootable while logical partitions are not bootable.
List of Diskpart Commands in Windows 11/10
| active | Marks the disk’s partition with focus as active. |
| add | Mirrors the simple volume with focus to the specified disk. |
| assign | Assigns a drive letter or mount point to the volume with focus. |
| attach vdisk | Attaches (sometimes called mounts or surfaces) a virtual hard disk (VHD) so that it appears on the host computer as a local hard disk drive. |
| attributes | Displays or sets or clears the attributes of a disk or volume. |
| automount | Enables or disables the automount feature. |
| break | Breaks the mirrored volume with focus into two simple volumes. |
| clean | Removes any and all partition or volume formatting from the disk with focus. |
| compact vdisk | Reduces the physical size of a dynamically expanding virtual hard disk (VHD) file. |
| convert | Converts file allocation table (FAT) and FAT32 volumes to the NTFS file system, leaving existing files and directories intact. |
| create | Creates a partition on a disk, a volume on one or more disks, or a virtual hard disk (VHD). |
| delete | Deletes a partition or a volume. |
| detach vdisk | Stops the selected virtual hard disk (VHD) from appearing as a local hard disk drive on the host computer. |
| detail | Displays information about the selected disk, partition, volume, or virtual hard disk (VHD). |
| exit | Exits the diskpart command interpreter. |
| expand vdisk | Expands a virtual hard disk (VHD) to the size that you specify. |
| extend | Extends the volume or partition with focus, along with its file system, into free (unallocated) space on a disk. |
| filesystems | Displays information about the current file system of the volume with focus and lists the file systems that are supported for formatting the volume. |
| format | Formats a disk to accept Windows files. |
| gpt | Assigns the gpt attribute(s) to the partition with focus on basic GUID partition table (gpt) disks. |
| help | Displays a list of the available commands or detailed help information on a specified command. |
| import | Imports a foreign disk group into the disk group of the local computer. |
| inactive | Marks the system partition or boot partition with focus as inactive on basic master boot record (MBR) disks. |
| list | Displays a list of disks, of partitions in a disk, of volumes in a disk, or of virtual hard disks (VHDs). |
| merge vdisk | Merges a differencing virtual hard disk (VHD) with its corresponding parent VHD. |
| offline | Takes an online disk or volume to the offline state. |
| online | Takes an offline disk or volume to the online state. |
| recover | Refreshes the state of all disks in a disk group, attempts to recover disks in an invalid disk group, and resynchronizes mirrored volumes and RAID-5 volumes that have stale data. |
| rem | Provides a way to add comments to a script. |
| remove | Removes a drive letter or mount point from a volume. |
| repair | Repairs the RAID-5 volume with focus by replacing the failed disk region with the specified dynamic disk. |
| rescan | Locates new disks that may have been added to the computer. |
| retain | Prepares an existing dynamic simple volume to be used as a boot or system volume. |
| san | Displays or sets the storage area network (san) policy for the operating system. |
| select | Shifts the focus to a disk, partition, volume, or virtual hard disk (VHD). |
| set id | Changes the partition type field for the partition with focus. |
| shrink | Reduces the size of the selected volume by the amount you specify. |
| uniqueid | Displays or sets the GUID partition table (GPT) identifier or master boot record (MBR) signature for the disk with focus. |
TIP: You can resize a Partition even if Disk Management fails using DISKPART and FSUTIL command-line tools for Disk Management.
Как создать загрузочную флешку с помощью командной строки
Загрузочная флешка необходима для выполнения различных задач, как административных задач на компьютере, так и восстановления работоспособности и установки операционных систем, удаления вирусов и многих других операций.
Функционал загрузочной флешки определяется составом образа, который планируется на него записать. Это могут быть образы LiveCD, образы операционных систем или специальные сборки и другое.
Существует множество утилит, которые позволяют создавать загрузочные USB накопители, однако не прибегая к стороннему программному обеспечению, для создания загрузочной флешки можно воспользоваться стандартными средствами Windows, а именно командной строкой. Для создания загрузочной флешки на ней необходимо создать загрузочный сектор, так называемый boot-сектор. Для этого откройте командную строку с правами администратора и введите команду DISKPART.
DISKPART – это специальная утилита, позволяющая работать с разделами жестких дисков, производить их очистку и форматирование, и другие операции. Утилита работает, так же, как и консоль Windows, посредством ввода текстовых команд.
Процесс создания загрузочной флешки с помощью утилиты DISKPART следующий:
Скриншот 1. Отображение в окне утилиты DISKPART списока доступных дисков
Необходимо подключить USB накопитель к компьютеру, после чего в окне утилиты DISKPART введите следующую команду (См.скрин. 1):list disk
Данная команда позволяет отобразить на экране список доступных дисков. Это необходимо для того, чтобы для дальнейшей работы с флешкой выбрать именно USB-накопитель, а не раздел жесткого диска.
Список дисков достаточно простой, в первом столбце идут номера дисков, во втором отображается их состояние, в третьем – размер и т.д. Ориентируясь на объем накопителя запомните номер диска, в моем случае флешка находится под номером 1 (Диск 1) (См. Скрин. 2).
Скриншот 1. Выбор USB-накопителя
Теперь следует выбрать накопитель, введите команду:select disk 1
В моем случае указан диск под номером 1, который на следующем этапе очистим, введите команду:clean
Диск подготовлен к дальнейшей его модификации. Создайте на флешке основной или главный раздел, введите команду:create partition primary
Работа в интерпретаторе сложна тем, что требуется точно соблюдать последовательность действий. Если вы создали раздел, то чтобы с ним работать его необходимо выбрать:select partition 1
Раздел вы выбрали, теперь сделайте его активным:active
Чтобы задать необходимую файловую систему на флешке необходимо ее отформатировать:format fs=NTFS
Процесс форматирования может длиться несколько минут, в зависимости от объема вашего носителя. При необходимости можно назначить букву дисковому разделу на флешке, введите команду:assign letter Z
Рекомендуем указывать букву с конца латинского алфавита, чтобы не создавать конфликт с другими разделами логических дисков, поэтому флешке назначена буква Z.
Итак, вы создали загрузочную флешку с помощью командной строки, также вы подготовили ее для записи образа, закройте DISKPART, введите команду:exit
Следующим шагом будет запись ISO образа на флешку, для этого его необходимо разархивировать и скопировать все папки и файлы в корень накопителя. Стоит отметить, что после разархивации ISO образа, файлы и папки могут быть помещены в папку с именем образа, необходимо скопировать на флешку не эту папку, а файлы и папки, которые в ней находятся. Для распаковки образа можно воспользоваться программами архиваторами, например, 7-Zip или HaoZip либо любой другой архиватор, который поддерживает работу с форматом файлов . ISO.
Кроме того, в случае если у вас установлена операционная система Windows 8 или Windows 10, так как данные операционные системы включают в себя стандартные средства для работы с ISO образами, для распаковки образа можно не использовать архиваторы, а смонтировать образ, для этого достаточно щелкнуть правой кнопкой мыши на файле ISO образа и в контекстном меню нажать кнопку «Подключить», после чего образ будет смонтирован в виртуальный DVD-привод, а файлы находящиеся в нем можно скопировать на созданную вами загрузочную флешку. Для отключения виртуального привода в проводнике щелкните на нем правой кнопкой мыши и в контекстном меню нажмите кнопку «Извлечь».
После копирования файлов из образа, флешка полностью готова для установки операционных систем или использования для выполнения восстановительных, реанимационных работ с системой и т.д. Не забудьте в настройках BIOS установить в качестве первого устройства загрузки USB-диск, чтобы компьютер загружался с флешки, а не с жесткого диска.
Why and How to Convert Primary Partition to Logical
Have you ever received one of the following error messages when creating partitions in Disk Management?
Error 1: This error message will appear if you create new partition in unallocated space of the hard disk which contains 3 primary partitions and one extended partition already.
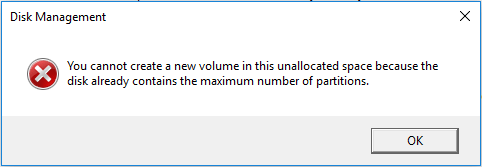
Error 2: This error message will emerge if you create new partition on the disk which holds 4 primary partitions already.
If you are troubled by these errors, to convert a primary partition to logical is a good solution.

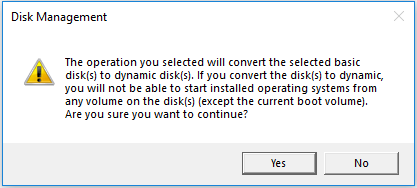
Of course, there are other solutions, and you can refer to Solutions to Maximum Number of Partitions and Creating Partition Will Convert Disk to Dynamic to get more details.
Tip: Do not set system partition and boot partition logical, because this may make Windows unbootable.
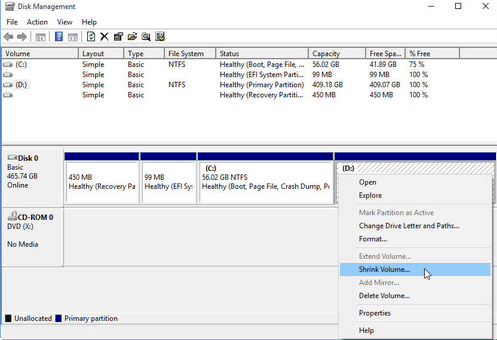
Solution 1 — Extend Volume in Windows 10 Disk Management — Extend Volume is Enabled [Video guide included]
When extend volume is enabled, you may use it to extend partition when there is unallocated space adjacent.
The key: unallocated space
How to produce unallocated space -> Shrink large partition to produce unallocated space; or delete the drive next to it to produce unallocated space
Now, you can enter the amount of space to shrink and then click «Shrink» button
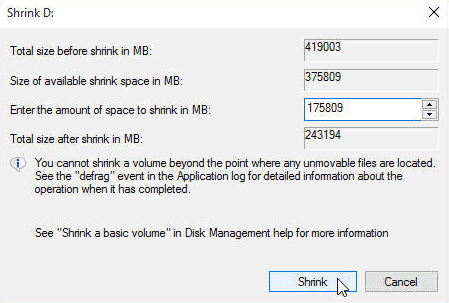
You can see some unallocated space when the shrinking process is completed.

And then you may claim the unallocated space to extend the adjacent partition using Extend Volume function in disk management.
Note: if the unallocated space is not adjacent to the one that you want to extend partition, you may use freeware Partition Resizer to do the unallocated space moving and extend it with the freeware too.
Video guide — how to delete volume to produce unallocated space next the one you want to extend
diskpart in Windows 10
If you can boot into Windows 10
If you can boot into your Windows 10 system, you simply need to open Command Prompt to access diskpart. To do so, follow these steps:
- Boot into Windows 10
- Press the Windows key and C to open the charm bar
- Type
- Click Command Prompt
- When Command Prompt opens, type
- Press Enter
For the full list of diskpart commands and paremeters, go to .
If you can’t boot into Windows 10
If you can’t boot into your Windows 10, you have these options available:
- Use the original DVD or USB with Windows 10 to access the Repair your computer option
- Boot into the System Recovery Options with Shift and F8
- Use Easy Recovery Essentials to launch Command Line
If you have the installation disc:
If you can’t boot, but you have the installation disc, follow these steps:
- Insert the Windows 10 or USB
- Restart the computer
- Press any key to boot from the media
- Click Repair your computer or press R
- Select Troubleshoot
- Select Command Prompt
- Type
- Press Enter
For the full list of diskpart commands and paremeters, go to .
If you don’t have the installation disc:
If you don’t have the installation disc, you can boot into System Recovery Options or use Easy Recovery Essentials.
To access diskpart without an official Windows 10 media, follow these steps:
- Reboot the system
- Press Shift and F8 very quickly
- At Choose an option, select Troubleshoot
- Select Command Prompt
- Type
- Press Enter
For the full list of diskpart commands and paremeters, go to .
If you use Easy Recovery Essentials:
Easy Recovery Essentials can run from any CD, DVD or USB flash drives.
To access diskpart using Easy Recovery Essentials, follow these steps:
- Download Easy Recovery Essentials
- Burn the ISO Image. Follow our instructions on how to burn a bootable ISO image. If you’d like to have a recovery USB instead, follow our instructions on how to make a recovery USB.
- Boot Easy Recovery Essentials from the CD, DVD or USB
- Select Launch Command Line
Fsutil Utility
Windows also includes an additional command-line tool for file, system, and disk management, called Fsutil. This utility helps you to change the short name of a file, find files by SID’s (Security Identifier) and perform other complex tasks.
FSUtil and Diskpart are powerful, but not for inexperienced Windows user. So do be careful, please.
There is not enough space available on the disk(s) to complete this operation
What do you do if you get the message – There is not enough space available on the disk(s) to complete this operation?
Most new computers with OEM Windows pre-installs come with 4 partitions. Hard disks configured as basic disks are limited to 4 primary partitions or 3 primary partitions and 1 extended partition and multiple logical drives. And as such, if you try to shrink the OS partition, you may find that you cannot create a 5th partition due to this limit.
There could be two possible solutions for this issue:
- As the disk pre-configured by OEM may have conflicts with the disk management tool in Windows, you should try some 3rd party tool to re-partition the disk.
- You may try to delete a less important partition created already and merge the space to create a new partition with a proper drive letter.
Deleting the partitions created by the OEM is often not possible due to the way the OEMs configure the partitions. Therefore the option then is to extend the operating system partition back to the original size to regain use of the unallocated space. If additional storage is needed, consider adding an external USB hard disk.