Windows 11 media creation tool: how to install/upgrade
Содержание:
- How To Use Windows 11 Media Creation Tool
- Создание загрузочной флешки Windows 10 в Media Creation Tool
- Новая материнская плата? Потеря Windows
- Media Creation Tool
- Upgrade to Windows 11 using Media Creation Tool
- Download Windows 11 Media Creation Tool
- Как создать загрузочную флешку с Windows 10?
- What you should know before you go ahead
- Use Windows Media Creation Tool to Upgrade Your PC
- Создание ISO файла или загрузочного DVD диска с Windows 10.
- Create an Installation Media or Download ISO file
- How to Upgrade or Get Windows 10 without Installation
- How to download the Windows 10 Media Creation Tool
- Use the Windows 10 Media Creation Tool to create a bootable USB memory stick with the Windows 10 setup
- Выводы статьи
How To Use Windows 11 Media Creation Tool
Once you have all the things you require, you can get ahead with upgrading your Windows through the Media Creation Tool. This part of the article will be discussing how you can use Windows 11 media creation tool to upgrade to Windows 11.
First, click on the link that leads you to the official Microsoft website. Choose “Windows 11“.
Now, There you will get all the information related to Windows 11. Click on “Download Now”
After you have downloaded the media creation tool for Windows 11, run it on your PC. You will be asked to accept the license terms. Once you do that, you will see a screen stating ‘Getting a few things ready.’
Next, you will see two options on the screen – ‘Upgrade this PC now,’ and ‘Create Installation Media (USB flash drive, DVD, or ISO file) for another PC.’
-
- Upgrade this PC- Choose this Option if you want to upgrade the PC on which you are running the Media Creation Tool.
- Create Installation Media for another PC- Select this option, if you want to create a bootable USB drive for another PC.
ALSO READ: How To Make Windows 11 USB Bootable
Создание загрузочной флешки Windows 10 в Media Creation Tool
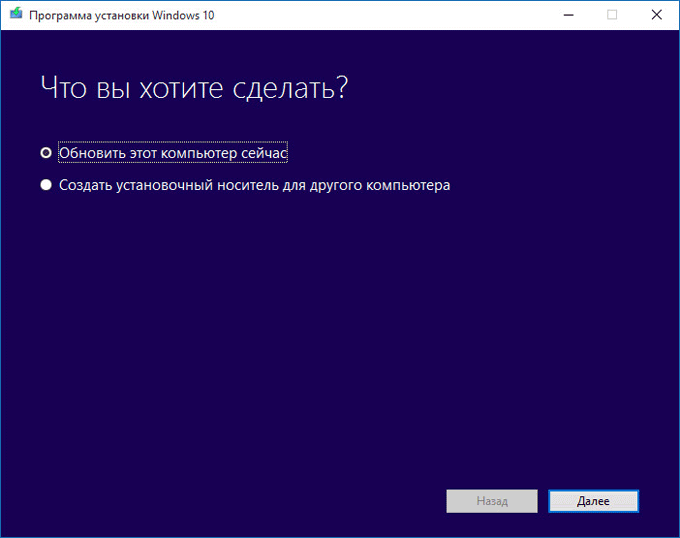
После запуска Media Creation Tool (Программа установки Windows 10), откроется окно «Что вы хотите сделать?». В этом окне вам предложат на выбор совершить два действия:
- Обновить этот компьютер сейчас.
- Создать загрузочный носитель для другого компьютера.
При выборе бесплатного обновления, на ваш компьютер будет скачана Windows 10, а затем произойдет обновление системы до Windows 10.
Если вы выберите пункт «Создать загрузочный носитель для другого компьютера», то вы можете записать DVD диск с операционной системой, или создать загрузочную флешку, для установки Windows 10 на свой или любой другой компьютер.
Обратите внимание на то, что если на данном компьютере вы будете устанавливать Windows 10 в первый раз, то вам потребуется ключ продукта Windows. Это касается установки Windows 10 с загрузочного устройства
При обновлении системы ключ продукта не потребуется, потому что система будет активирована автоматически.
Если вы будете переустанавливать Windows 10 на том компьютере, где уже было проведено обновление системы, при новой установке системы вам нужно будет пропустить ввод ключа во время установки. После завершения установки, операционная система будет активирована автоматически.
При помощи Media Creation Tool, я создам загрузочный носитель. Для этого необходимо будет активировать пункт «Создать загрузочный носитель для другого компьютера».
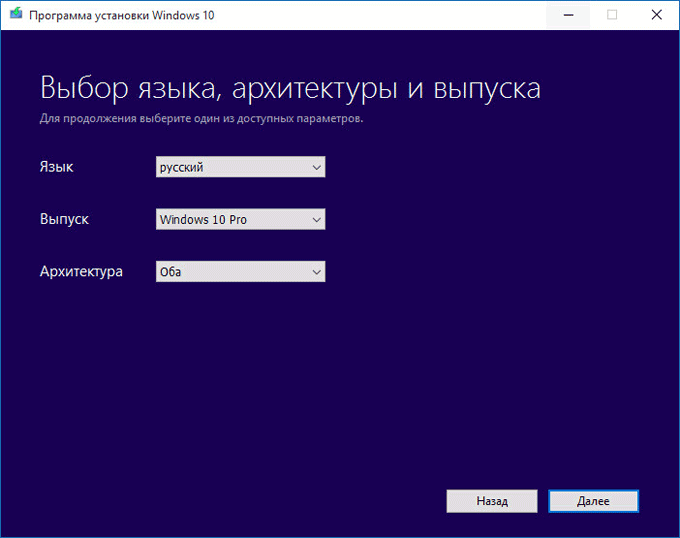
В следующем окне «Выбор языка, архитектуры и выпуска», вам нужно будет выбрать один из доступных параметров:
В случае выбора варианта из двух разрядных систем, на внешний носитель будет записана Windows 10 соответствующего выпуска, имеющая две разрядности: 64 и 32 бит. При установке Windows 10 на компьютер, вы можете выбрать, какую именно систему: Windows 10 x64, или Windows 10 x32 следует установить на данный компьютер. Соответственно на USB носителе должно быть достаточно места для записи обоих систем.
После выбора настроек, нажмите на кнопку «Далее».
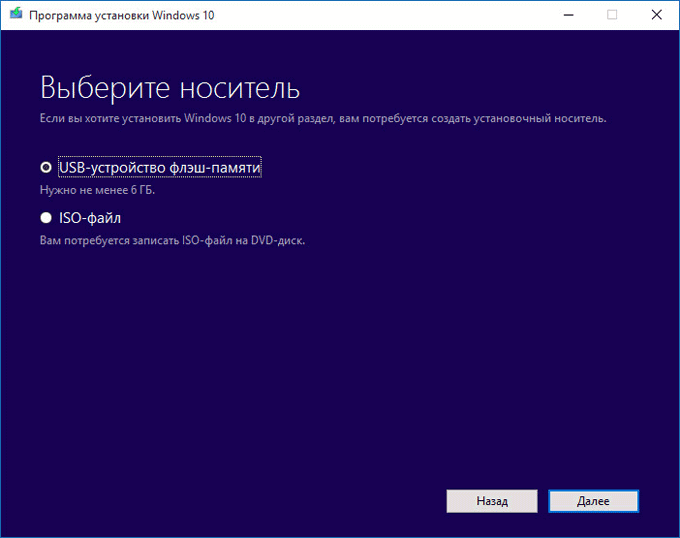
В новом окне «Выберите носитель», необходимо будет выбрать один из вариантов: «USB-устройство флэш-памяти» для создания загрузочной флешки, или «ISO-файл» для сохранения Windows 10 в виде ISO-файла, для последующей записи на DVD диск.
Так как я выбрал для записи систему с обоими разрядностями, то для этого мне понадобиться флешка объемом не менее 6 ГБ.
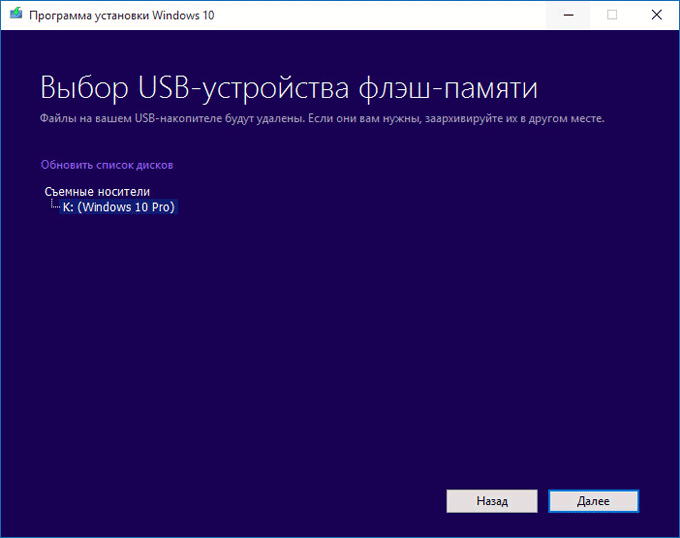
В окне «Выбор USB-устройства флэш-памяти» приложение обнаружит и отобразит флешку, которая была подключена к вашему компьютеру. Нажмите на кнопку «Далее» для запуска процесса загрузки и записи операционной системы.
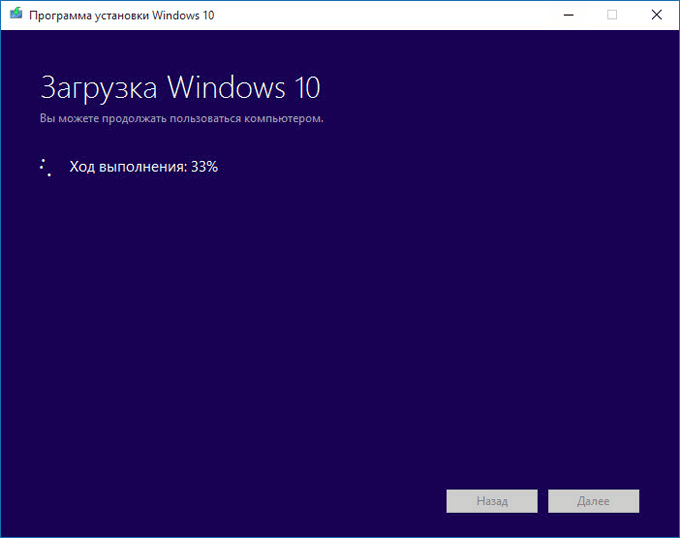
После этого, начнется загрузка Windows 10 на ваш компьютер, которая занимает некоторое время. Вы можете продолжать в это время использовать свой компьютер.
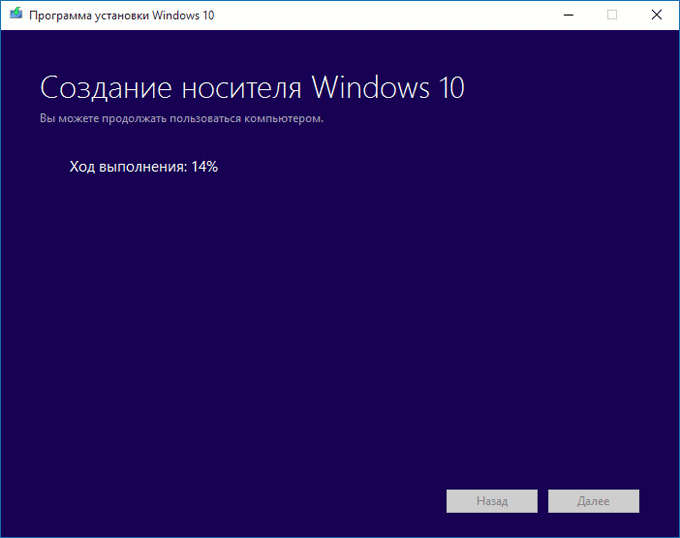
После завершения загрузки операционной системы, откроется окно «Создание носителя Windows 10».
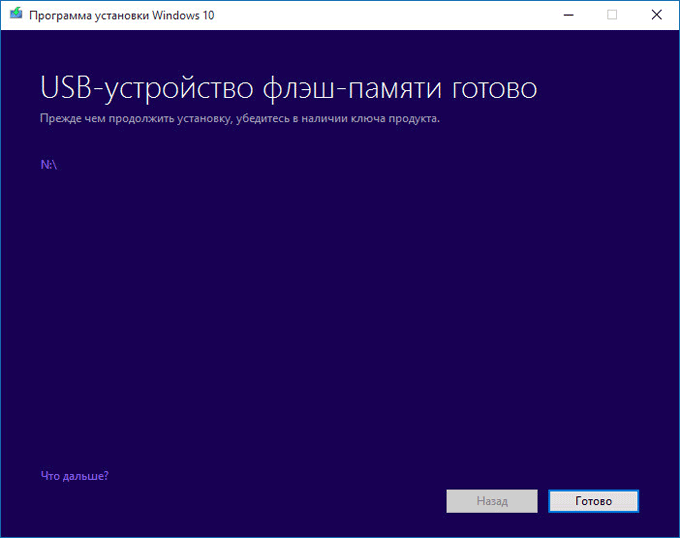
После завершения создания загрузочной флешки, будет открыто окно «USB-устройство флэш-памяти готово». Нажмите на кнопку «Готово» для выхода из приложения Media Creation Tool.
Теперь вы можете использовать загрузочную флешку с Windows 10 на своем, или любом другом компьютере.
Вам также может быть интересно:
- Обновление Windows 10 в Media Creation Tool
- Сравнение версий Windows 10: таблица
Новая материнская плата? Потеря Windows
При активации Microsoft сразу связывает лицензию ОС с уникальным кодом различных компонентов вашего ПК, называемым также Product ID. Благодаря этому становятся возможным обновления и возможные переустановки Windows 10 на этом компьютере в будущем. Однако существует риск отказа системы из-за слишком большого количества замененных системных компонентов.
После покупки нового жесткого диска или же обновления BIOS «десятку» придется активировать заново — это мы поняли во время тестирования. Однако все иначе в случае с материнской картой: после замены этого критического компонента Windows 10 больше не может быть активирована на этом компьютере. Необходимо покупать лицензию или же сначала установить старую версию, а уже с нее провести обновление до «десятки».
Этот метод, впрочем, работает только с Retail-вариантами с ключом в комплекте. Если же у вас OEM-версия, а материнская плата от того же производителя, что и ПК и была заменена в рамках ремонта, необходимо к нему же и обратиться. Производитель несет ответственность за восстановление прежнего состояния вашего компьютера.
Media Creation Tool
Создание загрузочной флешки с Windows 10 с помощью официального средства от Microsoft — Media Creation Tool. Это самый простой и самый надёжный способ, у нас с ним никогда не было никаких проблем. Приступим!
Во избежание прохождения процедуры заново, сразупопрошу обратить внимание на 6 и 7 пункты!
Потраченное время: 1ч. 40мин. Я подключал флешку в USB 2.0, пользовался не очень быстрым интернетом и скачивал сразу две архитектуры. Скорее всего, воткнув флешку в USB 3.0 и выбрав одну архитектуру (пункт 5) можно уменьшить время до 30-40 минут.
Ссылка/Link: https://www.microsoft.com/ru-ru/software-download/windows10
Или воспользуйтесь прямой ссылкой -> Скачать Media Creation Tool
Рис.1 — Скачиваем Media Creation Tool
2 — Запускаем скачанный исполняемый файл — MediaCreationTool.exe, нас поприветствует надпись Windows и начнётся Подготовка к созданию образа.(Рис.2)
Рис.2 — Подготовка при запуске, Media Creation Tool
3 — Читаем условия лицензии, чтобы знать на что мы соглашаемся, и жмём «Принять».(Рис.3)
Рис.3 — Применимые уведомления и условия лицензий в Media Creation Tool
4 — Далее нам предлагается выбрать что мы хотим сделать «Обновить этот компьютер сейчас» или «Создать установочный носитель (USB-устройство флэш-памяти, DVD-диск или ISO-файл)», выбираем второе.(Рис.4)
Рис.4 — Выбор действий в Media Creation Tool
5 — Выбираем язык, архитектуру и выпуск. По умолчанию стоит галочка «Использовать рекомендуемые параметры», здесь автоматически подобраны язык и архитектура для компьютера, на котором запущена это программа.(Рис. 5) Снятие этой галочки, делает доступным выбор параметров вручную. Доступно множество языков и три выбора архитектуры: «x32», «x64», и «Оба». Лично мне не помешает x32 и x64 на одной флешке, следовательно я выбираю «Оба» и жму «Далее».(Рис.5.1)
Рис. 5 — Выбор языка, архитектуры и выпуска, рекомендуемые параметрыРис. 5.1 — Выбор языка, архитектуры и выпуска вручную
6 — Выскакивает окно с предупреждением, о том что если выпуск на установочном носителе не соответствует выпуску Windows на компьютере, на котором вы будете его использовать, то потребуется ключ продукта для установки Windows.(Рис.6) Если вы переустанавливаете свою Windows 10 на новую чистенькую Windows 10 то при выборе правильной архитектуры ключ просить не должно.
Рис.6 — Предупреждение и необходимом соответствии выпусков Windows.
7 — Обратите внимание! Прежде чем записать образ Windows на флешку, Media Creation Tool скачает образ на диск «C», заранее проверьте доступное количество свободного места. Для одной из архитектур «x32» или «x64» потребуется 8Гб свободного места, а при выборе загрузки «Обеих» архитектур потребуется 16Гб свободного места. В противном случае вам покажут такое окно (Рис.7), предложат освободить место и начать все сначала
Рис.7 — Предложение начать все сначала из-за нехватки свободного места
8 — Выбираем в каком виде нам нужен образ «USB-устройство флэш-пямяти» или в виде «ISO-файла». Выбираем первое и жмём «Далее». (Рис.8)
Рис.8 — Выбираем носитель
9 — Выбираем нашу флешку которую хотим сделать загрузочной и жмем «Далее».(Рис.9)
Рис.9 — Выбор USB-устройства
10 — Далее программа начнёт скачивать образ с интернета. Лично у меня это заняло 50 минут. со скоростью интернета в 15Мбит/с. (Рис.10)
Рис.10 — Загрузка образа Windows 10
11 — После загрузки Media Creation Tool автоматически начнёт Создание загрузочного носителя Windows 10. (Рис.10) Эта процедура заняла ещё 40 минут.
Рис.10 — Создание загрузочного носителя Windows 10
12 — Программа оповещает нас о готовности загрузочной флешки.(Рис.11) Жмем «Готово». Мелькнёт окно с процессом удаления ненужных данных, по всей видимости это чистка диска «C» от образов скачанных туда перед созданием загрузочного носителя (Рис.12), и программа сама закроется.
Рис.11 — Загрузочная флешка готоваРис.12 — Удаление ненужных данных перед закрытием.
Всё! Загрузочная флешка у нас готова. Можно вытаскивать и пользоваться по назначению.
Поделиться публикацией
Была ли вам полезна статья? Есть возможность
поддержать проект.
Upgrade to Windows 11 using Media Creation Tool
Chandan Pandit
September 3, 2021 11:20 PM
Windows
The beta build of Windows 11 has started rolling out to Windows Insider users. Windows 11 brings many improvements over the normal Windows 10 such as a new redesigned home interface, a new Microsoft store with native support for Android apps, a re-touched taskbar and icons, and more. The stable rollout of Windows 11 might happen in late 2021 or early 2022. Many users are willing to try Windows 11 on their PC, but they are not officially eligible for that. Well, for those, Windows 11 Media Creation is a helpful tool. The Media Creation tool can upgrade its system to Windows 11 seamlessly.
The Windows Media Creation tool allows users to sideload Windows 11. It’s more like flagship a custom ROM in Android with the help of TWRP recovery. For some sets of people, the creation tool is easy to use and operable, but it might come out as a bit complicated for beginners. So, in this post, we’ll de deciding on How to upgrade your system to Windows 11 using Windows 11 Media Creation Tool.
Important steps before proceeding
- After installing Windows 11 using the Media Creation tool, all of your user data might get cleared. So, make sure to take the backup of your data, so you won’t face any problem if your user data gets cleared.
- A good network connection is always recommended. It’s must require to install Windows 11 and to create a bootable USB Drive.
- If you’re creating the bootable USB instead of installing Windows 11, a USB Drive with a minimum of 8GB of RAM is always suggested.
Download Windows 11 Media Creation Tool
First of all, make sure you have registered in the Windows Insider program. To download the official file, you will need a Windows Insider account, So make it first. Now go to this official page and download the Windows 11 installation media. Click on Windows 11 icon and then click on the download tool now. Your Windows 11 Installation media will be now downloaded successfully in minutes (depending upon your network speeds).
After installing the file, run it on your PC system. After this, you’ll get a prompt saying “Getting a few things ready!”. Now, you’ll see two options: “Upgrade the PC Now” and “Create Installation Media (USB flash drive, DVD, or ISO file) for another PC”.
You can choose the option accordingly, if you choose “Upgrade the PC Now”, then your system will be upgraded to Windows 11. While, on the other hand, if you choose “Create installation media” then it will create a bootable file instead of upgrading your system.
Upgrade the PC Now
If you choose the “Upgrade the PC Now” option, then the Media Creation tool will start downloading the Windows 11 File and upon downloading successfully, you will be able to install it in your system. After successful installation, complete the setup and you will be now able to run Windows 11 in your system seamlessly.
Create Installation Media
If you choose the option “Create installation media.” then you will now get a prompt asking for language, edition, and architecture details of your system. Make sure to enter the details correctly and also you can choose the option “Use the recommended option for the PC!”. It will automatically select the option compatible with your system.
Now click on Next and you’ll get two options namely “Create USB flash drive” and “ISO file”. In create a USB flash drive option, it will create a bootable USB drive for you. And if you choose the second option, you will be able to burn the ISO file later to create a bootable USB drive or a DVD.
- If you select the “Create USB Flash drive” option, then make sure to connect the USB. The tool will automatically download and burn into the US connection. And you can flash it later.
- For the “ISO File” option, it will download the ISO file of Windows 11 and you’ll later have to burn it using any third-party apps to make it bootable.
We recommend you to use the “Create USB Flash Drive” option here, as it is easier to use.
Ready to Install
After creating the bootable Windows 11, plug the USB Drive in which you’ve installed the bootable file. Boot the PC into BIOS and install the system. You can now use Windows 11 seamlessly if you have followed all the steps mentioned above correctly. You can read our “types of Windows 11 product key”, “Password Reset”, and TPM 2.0 Bypass” article here.
Как создать загрузочную флешку с Windows 10?
А теперь самое главное! Нам предлагают не просто скачать оригинальный образ Windows 10, но и сразу записать его на флешку или на DVD-диск (Рис.7). Это очень удобно, так как нам не нужно самим искать программы для записи и создания загрузочной флешки. Программа MediaCreationTool, все сделает за нас, и тем более создаст 100% рабочую загрузочную флешку.
(Рис.7)
Теперь выбираем разрядность 32 или 64 бит (Как определиться, какую разрядность вам выбрать читаем здесь). Система сама определит какая у вас разрядность предыдущей версии Windows (Рис.8).
(Рис.8)
Чтобы выбрать самим разрядность, нужно снять галочку и выбрать (Рис.9).
(Рис.9)
Если вы хотите скачать и сразу записать (создать загрузочную флешку с Windows 10), то вставьте в порт USB флешку, которая по объему должна быть не менее 8 ГБ. (Рис.10).
(Рис.10)
Проверка доступности флешки и её подготовки для записи (Рис.11).
(Рис.11)
Запись образа на флешку (Рис.12)
(Рис.12)
Загрузочная флешка Windows 10 почти готова (Рис.13).
(Рис.13)
Завершающий этап создания загрузочной флешки (Рис.14).
(Рис.14)
Если открыть уже созданную загрузочную флешку Windows 10 на компьютере, она выглядит так (Рис.15).
(Рис.15)
What you should know before you go ahead
Before creating an ISO file, a USB memory stick, or a DVD with the Windows 10 setup, you should first check these requirements and recommendations:
- You must have a working internet connection to be able to download the installation files.
- You must have sufficient free storage space on your hard disk or solid-state drive for the installation files. Microsoft recommends you have at least 8 GB of free space. However, the ISO file we last downloaded had 4.24 GB for the 64-bit version of Windows 10. When we chose to create an ISO file with both the 32-bit and the 64-bit setup, the file had 7.37 GB.
- If you want to create a USB memory stick, note that any data stored on it gets deleted. Media Creation Tool needs to format it before creating the bootable memory stick with the Windows 10 setup.
- If you want to create media with Windows 10 setup, you need to use a DVD or a USB memory stick with at least 8 GB of storage space.
- If you intend to upgrade your computer or device to Windows 10, make sure it meets the system requirements. You can check them here: Windows 10 Specifications.
- You must be logged in as an administrator on your computer to use the Media Creation Tool.
Use Windows Media Creation Tool to Upgrade Your PC
Windows Media Creation Tool is also a Windows upgrade tool as it can upgrade your PC to the latest Windows 10 version. According to many Windows 10 users, using Windows Update to upgrade Windows 10 may encounter some errors like the common Windows 10 update error 0x8007007e, leading to upgrade failure.
In this case, it is highly recommended to utilize Windows 10 Media Creation Tool to upgrade Windows 10. With this Windows upgrade tool, you can quickly upgrade your computer to the latest version of Windows 10. Here are detailed steps and screenshots.
Note: If you intend to upgrade your current computer to Windows 10, make sure it meets the Windows 10 system requirements.
Step 1. Download Windows 10 Media Creation Tool from Microsoft’s official website.
Step 2. Run the Media Creation Tool. To run this tool, you need to be an administrator.
Step 3. On this page, select Accept.
Step 4. Wait patiently for Media Creation Tool to get a few things ready. When it’s done, you can continue.
Step 5. On the What do you want to do page, select Upgrade this PC now, and then click Next.
Step 6. At this time, Media Creation Tool will download some files for updates and then check your PC. This process may take some time. Just wait patiently and it won’t be too long.
Step 7. Read the license terms and click Accept.
Step 8. Wait for Media Creation Tool to check for updates.
Step 9. Windows 10 Media Creation Tool will check for your PC again and make sure you are ready to install.
Step 10. When you get this page, you’ll see a recap of what you’ve chosen, and what will be kept through the upgrade. Choose Change what to keep, you can select what to keep by yourself.
Step 11. Choose whether you would like to Keep personal files and apps, Keep personal files only, or keep Nothing during the upgrade. After selection, then click Next to continue.
Step 12. Close any running applications and when you’re ready, select Install. During the installation, your PC will restart for a few times. Please don’t turn off your PC.
Создание ISO файла или загрузочного DVD диска с Windows 10.
Если вам необходимо получить ISO файл, процесс будет следующим:
- Посетите страницу Microsoft (ссылка в первом примере) для загрузки Media Creation Tool
- На странице нажмите «Скачать средство сейчас».
- Вставьте DVD диск для записи или в случае создания ISO пропустите этот шаг.
- Запустите приложение и примите условия лицензионного соглашения.
- Выберите «Создать установочный носитель (USB-устройство флеш памяти, DVD диск или ISO файл)» и нажмите «Далее».
- Выберите правильные настройки для вашей версии Windows 10 и нажмите «Далее».
- Выберите носитель, в нашем случае это «ISO файл» и нажмите «Далее».
- Укажите место для его сохранения. Нажмите кнопку «Сохранить».
- Дождитесь завершения процесса (Вы можете продолжать пользоваться компьютером).
- По окончании процесса вы найдете готовый ISO файл Windows 10, также вам будет предложено записать DVD диск или вы можете сделать это позже, с помощью сохраненного образа системы, нажмите кнопку «Готово».
Все.
Create an Installation Media or Download ISO file
Another function of Window 10 Media Creation Tool is that it can help you create an installation media for another PC or download ISO file. And all Windows 10 editions are available when you select Windows 10, except for Enterprise edition. When finished, you can use the bootable USB drive or DVD disc to install Windows 10.
Note: Before you install or reinstall Windows on your PC, remember to back up important files on your system disk.
Before you download Windows 10 Media Creation tool, make sure you have:
- A PC with a working Internet connection
- A blank USB flash drive or DVD with at least 8 GB of available storage space
- A product key if you’ve not installed Windows 10 before or if you want to perform a clean install
Now you can follow the steps as below to create Windows 10 installation media (USB flash drive or DVD) and use it to install a new copy of Windows 10, perform a clean installation, or reinstall Windows 10.
Step 1. Download Windows 10 Media Creation Tool and follow the instruction to get the following page. Then, check the second option Create installation media (USB flash drive, DVD, or ISO file) for another PC and click Next.
Step 2. Choose the Language, Windows Edition, and Architecture that you want to use for creating the installation media. After selection, then click Next to continue.
You can also choose to Use the recommended options for this PC, which automatically selects the language, edition, and architecture that match the PC that you are using right now.
Step 3. Choose what kind of media storage device you want to use. Here I take USB flash drive as an example. Choose USB flash drive and press Next.
Step 4. Select the USB drive you want to use for creating Windows 10 installation media and click Next.
Step 5. Then Microsoft Media Creation Tool starts to download the latest Windows 10 installation files on your computer or device.
Step 6. When the download is completed, it will start to create Windows 10 media.
Step 7. When it is done, click Finish and then you can use that drive to boot up your computer and install Windows 10.
If the computer that you want to install Windows 10 has a DVD player, you can also select ISO file to burn the ISO file to a DVD later.
Just follow the step-by-step prompts on the Media Creation Tool to download Windows 10 installation files and save the ISO file to a specific location. When it is finished, you can burn the ISO file to a DVD.
How to Upgrade or Get Windows 10 without Installation
After reading the above, some users may find, even Windows Media Creation Tool is easy to use, it will still take you much time to upgrade or install Windows 10. Is there any much simpler way on Windows installation?
Actually, there is a method that can make Windows 10 installation as a breeze — migrate Windows 10 from another healthy PC to your PC with a Windows migration tool. If your friends or family are using the latest Windows 10, you can just use the Windows migration tool to migrate their Windows OS to your PC without reinstallation.
In this way, you do not need to create an installation media with Windows 10 Media Creation Tool and then use it to install Windows 10 as the whole process is time-consuming.
Well then, how to migrate Windows 10 with a reliable Windows migration tool? Here it is recommended to use MiniTool Partition Wizard Pro Ultimate Edition to migrate Windows 10.
MiniTool Partition Wizard is a reliable Windows migration tool as well as a professional partition manager trusted by tens of millions of people. It helps users to repartition hard drive, extend partition, convert FAT to NTFS, check files system, convert MBR to GPT without data loss, wipe disk, copy partition and migrate OS to SSD/HD, etc.
With MiniTool Partition Wizard, you can use Windows 10 operating system without installation.
Step 1. Shut down your computer and take out your system disk. Connect the HDD/SSD to another PC of your family or friends who are using the latest Windows 10 via a SATA-to-USB cable.
Note: If there are important files and data on your system disk, please make a backup as the process will delete all the files on your disk. If it is a brand new disk, then you can go ahead directly.
Step 2. Get the system cloning software to computer by clicking the following button. And run it to get the main interface.
Step 3. Select the function Migrate OS to SSD/HD Wizard on the top toolbar.
Step 4. Choose option B to move operating system to another hard disk, as the following picture shows.
Step 5. Then, choose your HDD/SSD to migrate OS to and click Next.
Step 6. All data saved on your HDD/SSD will be destroyed, so please make sure there is no important file and data on the SSD or backup significant ones in advance. Then click Yes on the pop-up Window.
Step 7. Choose a copy method and click Next. If you choose the first one, system partition and boot partition will be enlarged to take up all space of the SSD. If you choose the second one, partitions will be cloned with the same partition size, but you can adjust partition size and location according to actual demands by dragging the handle.
Step 8. This page will remind you to reset BIOS order, giving the new SSD boot priority, so your computer can boot from the new system disk successfully. Then click Finish.
Step 9. At last, please click Apply button on the top to apply all these pending operations.
Since the Windows OS is still running, MiniTool Partition Wizard will ask you to restart the computer for data protection.
You see, it is very convenient to migrate OS to another disk with this Windows migration tool. If you find Windows reinstallation is troublesome and time-consuming, you can try using MiniTool Partition Wizard, which can be a big help.
How to download the Windows 10 Media Creation Tool
If you’re wondering what the Windows 10 Media Creation Tool is, here’s the answer: a small executable file made by Microsoft, that allows you to download Windows 10 and create your installation media both on USB devices or in an ISO file. Furthermore, the Windows 10 Media Creation Tool also lets you directly upgrade your current computer or device to the latest version of the operating system.
The next question you might ask is: «How do I get Windows 10 Media Creation Tool?» To download the Media Creation Tool, open your favorite web browser and go to this webpage: Download Windows 10. Scroll until you reach the «Download tool now» button found in the «Create Windows 10 installation media» section.
Download the Windows 10 Media Creation Tool
Microsoft asks you to download an executable file called MediaCreationTool21H1.exe, with a size of 18.5 MB. The file name ends with the version number of the latest Windows 10 update. In our case, 21H1 is the version number for Windows 10 with May 2021 Update. Save the executable file for the Windows 10 Media Creation Tool somewhere on your PC and then run it with a double-click or double-tap.
Double-click on MediaCreationTool21H1.exe
When you see the UAC prompt on your screen, choose Yes to allow the MediaCreationTool21H1.exe to run.
UAC asks your approval to run the Media Creation Tool
Depending on what you want to do, read the next section of this tutorial or the one after it.
TIP: The future versions of the MediaCreationTool21H1.exe file and of Windows 10 will have a different version number at the end. To learn more about Windows 10 versions, read: How to check the Windows 10 version, OS build, edition, or type.
Use the Windows 10 Media Creation Tool to create a bootable USB memory stick with the Windows 10 setup
You can use the Media Creation Tool as a Windows 10 USB tool. In other words, it can download the Windows 10 setup files and automatically create a bootable Windows 10 USB memory stick, which you can then use to install the operating system on any computer. When the Windows 10 Media Creation Tool loads its user interface, it asks you to accept its license terms. Read the terms, and click or tap Accept to continue.
Accept the license terms for the Windows 10 Media Creation Tool
Media Creation Tool needs a few seconds to «get a few things ready.» Then, it asks whether you want to upgrade your PC or create installation media that you can use to install Windows 10. Check the second option: «Create installation media (USB flash drive, DVD, or ISO file) for another PC,» and press Next.
Choose to create installation media (USB flash drive, DVD, or ISO file)
Next, you can choose the Language, Edition, and Architecture (32-bit, 64-bit, or both) that you want to use for the Windows 10 setup media. By default, the Media Creation Tool uses the recommended options for your PC. It is best to leave these options as they are and just press Next. However, if you uncheck the box for «Use the recommended options for this PC,» you can set things in detail before moving on to the next step.
Select the language, architecture, and edition
You are prompted about the media storage you want to use. Plugin the USB memory stick on which you want to store the Windows 10 setup files, select «USB flash drive» and press Next.
Choose to create a bootable USB flash drive with the Windows 10 setup
You see all the flash drives and external hard disks currently connected to your Windows computer or device. Select the one you want to use for creating Windows 10 installation media, and then press Next. Do not forget that all the data on the drive is going to get wiped during this process. Make sure that you have a copy of it before moving forward.
Select the flash drive or external hard drive for the Windows 10 setup files
Once you have selected the USB flash drive, the Windows 10 Media Creation Tool starts to download the latest installation files. Depending on your internet connection speed and the load on Microsoft’s servers, this might take a while. All you need is patience.
Downloading the Windows 10 setup files
Once the download of the Windows 10 setup files is over, it is verified for integrity. Then, the USB memory stick you selected is made bootable, with the newest Windows 10 setup. This process may take another couple of minutes.
Creating the Windows 10 media
When the process is finished, you are informed that the USB memory stick is ready. Click or tap Finish, and then you can use that drive to boot from and install Windows 10.
Click or tap Finish
Safely remove the USB flash drive from your computer, and use it as you see fit.
TIP: To install Windows 10 without problems, read: How to install Windows 10 from DVD, USB, or ISO file.
Выводы статьи
В бесплатной программе Media Creation Tool можно выполнить обновление Windows 10 до новой версии системы. Программа выполнит все необходимые операции, в итоге, на компьютере будет установлена самая последняя версия Windows 10. При настройках по умолчанию, в обновленной версии системы будут сохранены все данные пользователя и установленные программы.
Обновление Windows 10 в Media Creation Tool (видео)
Похожие публикации:
- Сравнение версий Windows 10: таблица
- Как отключить или удалить OneDrive в Windows 10
- Диск восстановления Windows 10
- Как установить русский язык в Windows 10 — 2 способа
- Индекс производительности Windows 10 — 5 способов